今回の環境は次のとおりです。
- OS:Vista
- 動作環境:ローカル接続。通信にnetTcpBindingを使用。
- 開発環境: Visual Studio 2009
- .NET : 3.5
- ホストアプリケーション: フォームアプリケーション
- クライアントアプリケーション:コンソールアプリケーション
1.プロジェクトの作成
空のソリューションを作成し、プロジェクトを新規作成します。プロジェクトテンプレートはWindows Forms Applicationを選択しました。
2.サーバプログラムの作成
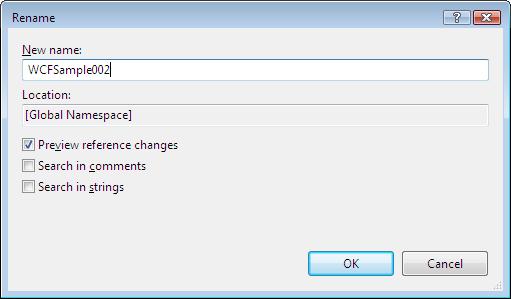
WCFSample001で作成したIProductService,ProductService,Product.csをプロジェクトのフォルダにコピーし、プロジェクト右クリック→[Existing Item...]からIProductService.cs,ProductsService.cs,Product.csを選択します。IProductService.csをエディタに表示し、WCFSample001のネームスペースをWCFSample001→WCFSample002に変更します。(IProductService.csを開いたエディタ上でネームスペースを 右クリック→[Refactor]を選択して表示されるRenameダイアログ(下の図参照)でWCFSample002に変更 すれば、すべてのファイルで変更が反映されます。便利です!!
一応、変更後のファイルの内容を記載しておきます。
Product.cs
using System;
using System.Collections.Generic;
using System.Linq;
using System.Text;
using System.Runtime.Serialization;


namespace WCFSample002.Production
{
    [DataContract]
    public class Product
    {
        [DataMember]
        public int ProductID;

        [DataMember]
        public string Name;

        [DataMember]
        public string Color;

        [DataMember]
        public decimal StandardCost;

        [DataMember]
        public decimal ListPrice;

        [DataMember]
        public decimal Weight;
    }
}
IProductService.cs, ProductService.cs
using System;
using System.Collections.Generic;
using System.Linq;
using System.Runtime.Serialization;
using System.ServiceModel;
using System.Text;

namespace WCFSample002.Production
{
    // NOTE: If you change the interface name "IProductService" here, you must also update the reference to "IProductService" in App.config.
    [ServiceContract]
    public interface IProductService
    {
        [OperationContract]
        List<int> GetProductIDs();

        [OperationContract]
        Product GetProductByID(int productID);

        [OperationContract]
        bool ChangeListPrice(int productID, decimal newListPrice);
    }
}
using System;
using System.Collections.Generic;
using System.Linq;
using System.Runtime.Serialization;
using System.ServiceModel;
using System.Text;
using System.Data;
using System.Data.Common;
using System.Data.SqlClient;
using System.Configuration;
namespace WCFSample002.Production
{
// NOTE: If you change the class name "ProductService" here, you must also update the reference to "ProductService" in App.config.
public class ProductService : IProductService
{
private DbConnection CreateConnection()
{
return new SqlConnection(System.Configuration.ConfigurationManager.ConnectionStrings["AdventureWorksConnection"].ConnectionString);
}
#region IProductService Members
public List
System.ServiceModel,System.Runtime.Serialization,System.Confuguration.dllを参照に追加し、コンパイルできることを確認します。
4.App.configの編集(サービスの定義)
4.1 サービスの定義
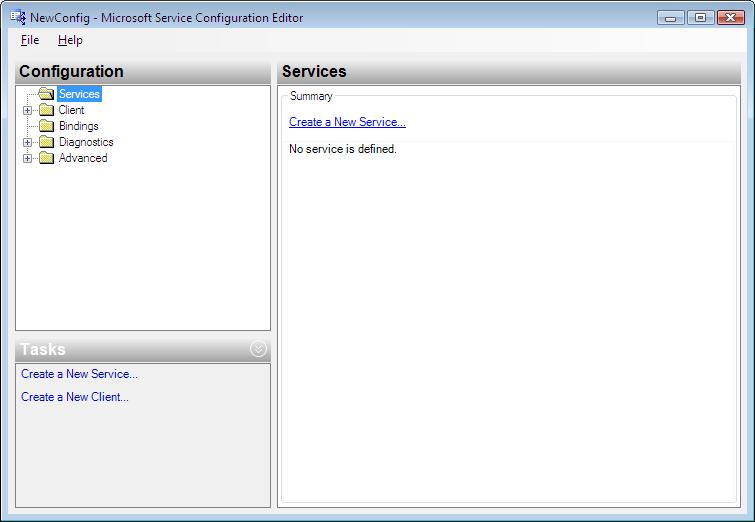
今回はWCF Service Configurator Editorを使って、WCFサービスを定義したいと思います。まず、新規項目の追加でApp.configを作成します。
次に,App.configを右クリックし、[Edit WCF Configuration]を選択します(たまに出ないときがあります?)。
Service Configuration Editorが表示されるので、次の手順でサービスを登録します。
最初に、Servicesのフォルダアイコンを選択し、Create New Serviceをクリックします。
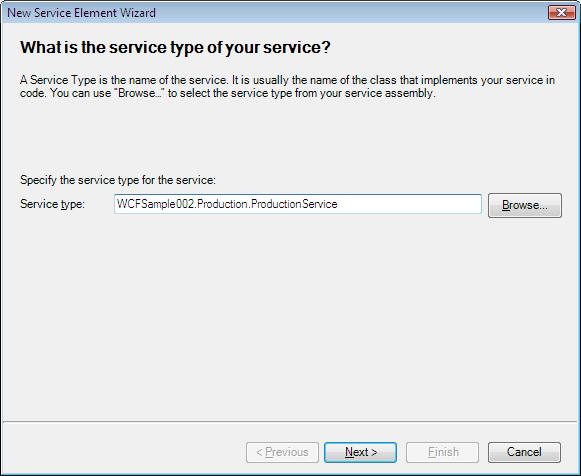
次に、サービスタイプを入力しNextボタンをクリックします。警告がでても無視しします。
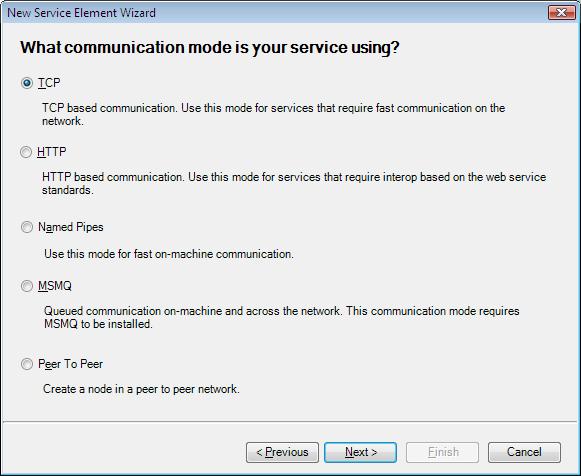
次に、通信方法を選択します。netTcp接続を使用するので、TCPを選択して、[Next]ボタンをクリックします。
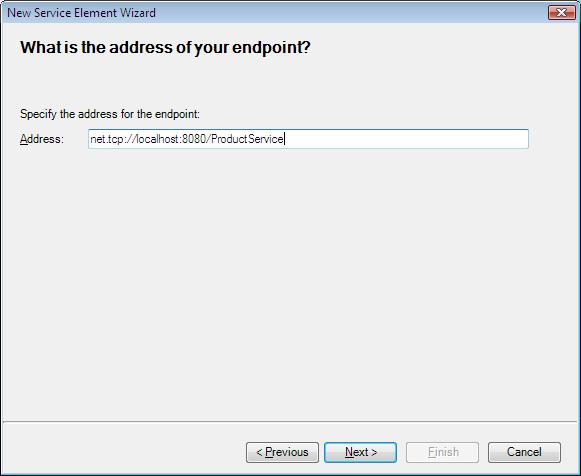
次に、エンドポイントのアドレスを定義します。[Next]ボタンをクリックします。
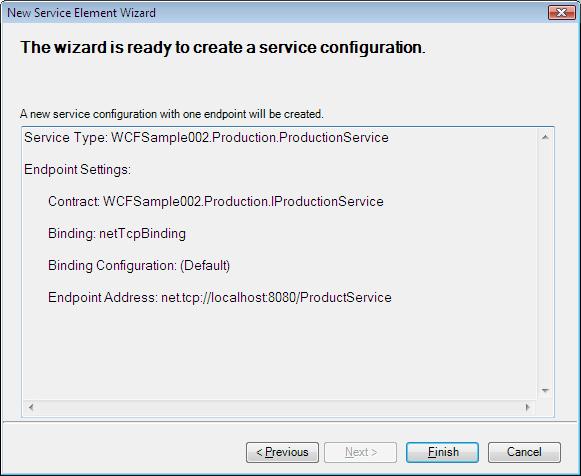
設定確認画面が表示されるので、[Finish]をクリックして設定を終了します。
Service Configuration Editorを閉じて、App.configを確認すると、次のようになります。
<?xml version="1.0" encoding="utf-8" ?>
<configuration>
    <system.serviceModel>
        <services>
            <service name="WCFSample002.Production.ProductionService">
                <endpoint address="net.tcp://localhost:8080/ProductService" binding="netTcpBinding"
                    bindingConfiguration="" contract="WCFSample002.Production.IProductionService" />
            </service>
        </services>
    </system.serviceModel>
</configuration>
4.2メタデータ公開用のエンドポイントを定義する
net.tcp接続を行う場合は、サービスのアドレスとは別に、クライアントがProxyクラスを作成するためのメタデータを公開するエンドポイントを用意する必要があります。メタデータ公開用に編集したApp.configは次のようになります。IMetadataExchangeというコントラクトのエンドポイントが記述されているエンドポイントがメタデータ公開用のエンドポイントです。以下のコンフィグファイルにはDB接続の文字列も一緒に定義しています。
<?xml version="1.0" encoding="utf-8" ?>
<configuration>
  <connectionStrings>
    <add name="AdventureWorksConnection" connectionString="Data Source=.\SQLEXPRESS;Initial Catalog=AdventureWorks;User ID=【ユーザID】;Password=【パスワード】"/>
  </connectionStrings>
  <system.serviceModel>
    <services>
      <service name="WCFSample002.Production.ProductService" behaviorConfiguration="WCFSample002.ProductServiceBehavior">
        <endpoint address="net.tcp://localhost:8080/ProductService" binding="netTcpBinding"
            bindingConfiguration="" contract="WCFSample002.Production.IProductService" />
        <endpoint address="net.tcp://localhost:8080/ProductService/MEX" binding="mexTcpBinding" contract="IMetadataExchange" />
      </service>
    </services>
    <behaviors>
      <serviceBehaviors>
        <behavior name="WCFSample002.ProductServiceBehavior">
          <serviceMetadata/>
        </behavior>
      </serviceBehaviors>
    </behaviors>
  </system.serviceModel>
</configuration>
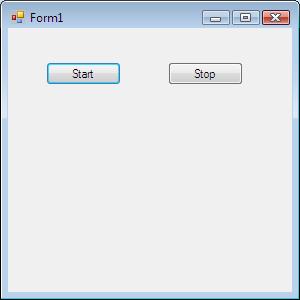
5.WCFサービスホスト用のフォーム定義
次のようにフォーム用のプログラムを定義しました。Startボタンを押すと、サービスを開始し、Stopボタンを押すとサービスを停止するシンプルなプログラムです。
Start,Stopボタンが押されたときのプログラムは次のとおりです。
using System;
using System.Collections.Generic;
using System.ComponentModel;
using System.Data;
using System.Drawing;
using System.Linq;
using System.Text;
using System.Windows.Forms;
using System.ServiceModel;

namespace WCFSample002
{
    public partial class Form1 : Form
    {
        public Form1()
        {
            InitializeComponent();
        }

        ServiceHost _serviceHost = null;
        private void btnStart_Click(object sender, EventArgs e)
        {
            _serviceHost = new ServiceHost(typeof(WCFSample002.Production.ProductService));
            _serviceHost.Open();
            btnStart.Enabled = false;
            btnStop.Enabled = true;
        }

        private void btnStop_Click(object sender, EventArgs e)
        {
            _serviceHost.Close();
            _serviceHost = null;
            btnStop.Enabled = false;
            btnStart.Enabled = true;
        }
    }
}
プログラムを実行すと、Fire Wallの警告が出る場合は、[Unblock]を押してください。
6.クライアントプログラムの作成
6.1 プロキシクラスの作成
今回は、Visual Studio上のサービスの参照の追加ではなく,svcutilを使って、プロキシクラスを作成します。WCFサービス用のサービスホストプログラムを実行した状態で、Visual Studio 2008のコマンドプロンプトを表示し、以下の画像のように入力します(Visual Studio 2008用のコマンドプロンプトではなくてもsvcutil.exeにパスが通っていれば、コマンドプロンプトからでも問題ないと思います)。
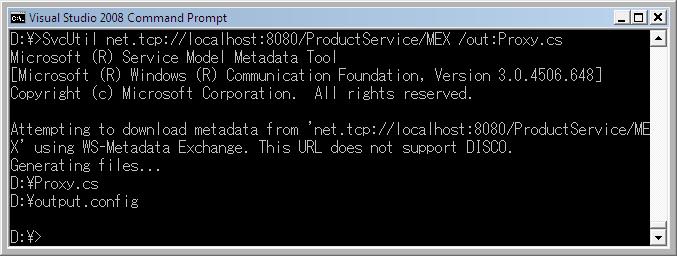
コンフィグ用にoutput.configも作成されますが、今回はプロキシ用のProxy.csのみ使用します。
6.2クライアントプロジェクトの作成
ソリューションを右クリックし、新しいコンソールアプリケーションプロジェクトを作成します。クライアントプロジェクトを右クリックし、スタートアッププロジェクトに設定しておきます。プロジェクトのフォルダに6.1で作成した、Proxy.csをコピーし、プロジェクトに追加します。
6.3クライアントプロジェクトのApp.config編集
app.configを編集します。存在しなければ、作成してください。次のように編集します。
<?xml version="1.0" encoding="utf-8" ?>
<configuration>
    <system.serviceModel>
      <client>
        <endpoint name="TcpProductEndpoint" address="net.tcp://localhost:8080/ProductService"
                  binding="netTcpBinding" contract="IProductService" />
      </client>
    </system.serviceModel>
</configuration>
6.4クライアントプログラムの編集
プロジェクト作成時に、自動的に作成されている、Program.csを開き、メインプログラムを次のように編集します。
using System;
using System.Collections.Generic;
using System.Linq;
using System.Text;

namespace WCFSample002.Client
{
    class Program
    {
        static void Main(string[] args)
        {
            System.Console.WriteLine("WCFサービスホストを起動したら、キーを入力して下さい。");
            System.Console.Read();
            ProductServiceClient proxy = new ProductServiceClient("TcpProductEndpoint");

            int[] productIDs = proxy.GetProductIDs();

            foreach (int productID in productIDs)
            {
                Console.WriteLine("Product ID: " + productID);
                WCFSample002.Production.Product product = proxy.GetProductByID(productID);
                Console.WriteLine("Name: " + product.Name);
                Console.WriteLine("Color: " + product.Color);
                Console.WriteLine("ListPrice: " + product.ListPrice);

            }
            proxy.Close();

            Console.WriteLine("終了するにはなにかキーを押してください。");
            Console.ReadLine();

        }
    }
}
7.プログラムの実行
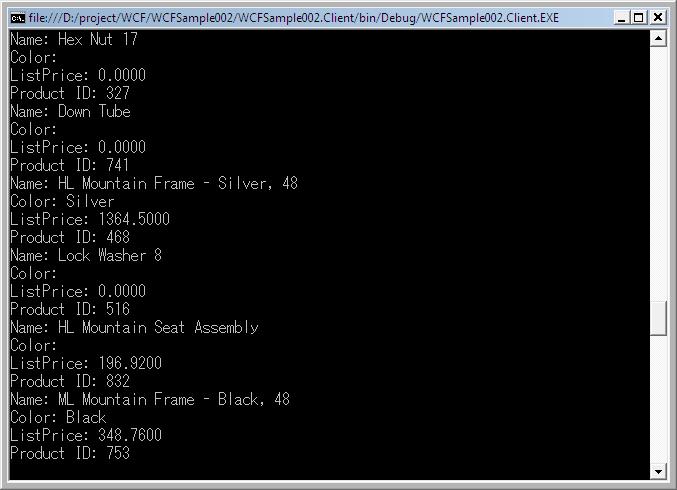
最初にWCFサービスをホストするプログラムを実行し、フォームの[Start]ボタンをクリックしてサービスを開始した後、クライアントアプリケーションを実行します。実行結果は次のとおり
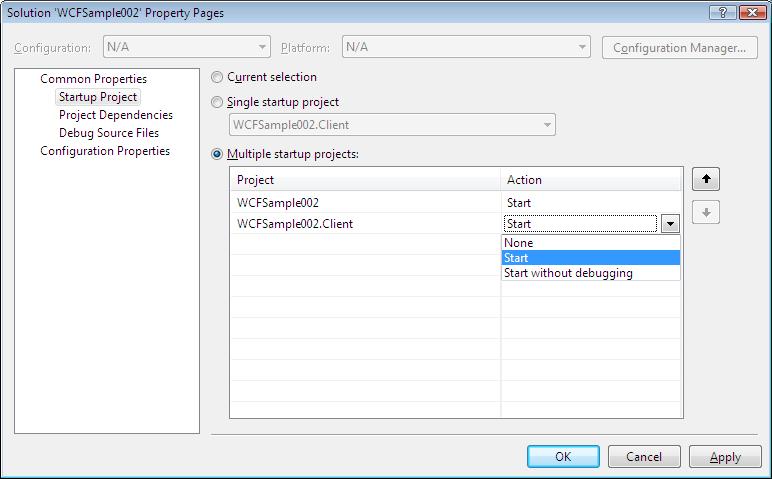
Visual Studioのソリューションのプロパティから複数のプロジェクトを同時に起動するように設定できます。WCFホスト、クライアントを作成してデバッグするときに便利です。Startup Projectでホストプログラム、クライアントプログラムの両方を起動(Start)するように設定することで、Visual Studio からプログラムを複数起動できるようになります。
今回のプログラムは以上です。といいますか、次回からはホストプログラムとクライアントプログラムを分けて書こうと思います。改めて全体を見ると、画像つきだとなんか長いです。