WCFのソリューションを再作成したので、そのメモです。
今回の構成は1つのソリューションにサービスクラス用プロジェクト、WCFサービスのホストプロジェクト,WCFクライアントプロジェクトの3プロジェクトを作成します。通信にはASP.NET XML Webサービス(WS-I Basic Profile)と互換性のある、basicHttpBindingを使用します。データベースはここで作成したものを使用する前提で記述しています。
動作環境は次のとおり
- Windows Vista Enterprise(クライアント,ホスト同一マシン)
- .NET 3.5
- 開発環境 Visual Studio 2008 Professional
1. ソリューションを作成
Visual Studioを起動して空のソリューションBlank Solutionを新規作成する。今回はWCFSample005という名前で作成しました。
2.WCFサービスプロジェクトの作成とWCFサービスクラスの作成
ソリューションエクスプローラで、ソリューションを右クリック→[Add]→[New Project]でプロジェクトを新規作成します。名前はWCFSample.ProductServiceとします。
次にServiceContractの定義と実装を行います。処理内容は過去のサンプルと同じです。
サービスコントラクトは次のとおり
using System;
using System.Collections.Generic;
using System.Runtime.Serialization;
using System.ServiceModel;
using System.Text;
namespace WCFSample.ProductService
{
[ServiceContract(Namespace="http://handcraft.wcfsample.org/2008/04/26", Name="ProductService")]
public interface IProductService
{
[OperationContract]
List
サービスコントラクトで使用されているProductクラスは次のとおり
using System;
using System.Collections.Generic;
using System.Linq;
using System.Text;
using System.Runtime.Serialization;

namespace WCFSample.ProductService
{
    [DataContract(Namespace="http://handcraft.wcfsample.org/2008/04/26", Name="Product")]
    public class Product
    {
        [DataMember]
        public int ProductID;

        [DataMember]
        public string Name;

        [DataMember]
        public string Color;

        [DataMember]
        public decimal StandardCost;

        [DataMember]
        public decimal ListPrice;

        [DataMember]
        public decimal Weight;
    }
}
サービスクラスは次のとおり
using System;
using System.Collections.Generic;
using System.Text;
using System.Data.Common;
using System.Data.SqlClient;
using System.Configuration;
using System.Data;


namespace WCFSample.ProductService
{
    public class ProductService : IProductService
    {
        private DbConnection CreateConnection()
        {
            return new SqlConnection(System.Configuration.ConfigurationManager.ConnectionStrings["AdventureWorksConnection"].ConnectionString);
        }

        #region IProductService Members

        public List<int> GetProductIDs()
        {
            List<int> productIDs = new List<int>();
            using (DbConnection cn = CreateConnection())
            {
                DbCommand cmd = cn.CreateCommand();
                cmd.CommandText = @"SELECT ProductID FROM Production.Product";
                cmd.CommandType = CommandType.Text;

                cn.Open();
                DbDataReader reader = cmd.ExecuteReader();
                while (reader.Read())
                {
                    productIDs.Add(reader.GetInt32(0));
                }
                reader.Close();
                cn.Close();

                return productIDs;
            }
        }

        public bool ChangeListPrice(int productID, decimal newListPrice)
        {
            using (DbConnection cn = CreateConnection())
            {
                StringBuilder builder = new StringBuilder();
                builder.Append(" UPDATE Production.Product ");
                builder.Append("    SET ListPrice = " + newListPrice.ToString());
                builder.Append(" WHERE ProductID = " + productID.ToString());

                DbCommand cmd = cn.CreateCommand();
                cmd.CommandType = CommandType.Text;
                cmd.CommandText = builder.ToString();

                cn.Open();

                int result = cmd.ExecuteNonQuery();

                return (result == 1);
            }
        }

        public Product GetProductByID(int productID)
        {
            using (DbConnection cn = CreateConnection())
            {
                DbCommand cmd = cn.CreateCommand();
                cmd.CommandType = CommandType.Text;
                cmd.CommandText = @"SELECT ProductID, Name, Color, StandardCost, ListPrice, Weight
                                      FROM  Production.Product
                                     WHERE ProductID = " + productID.ToString();
                cn.Open();
                DbDataReader reader = cmd.ExecuteReader(CommandBehavior.SingleRow);
                Product product = new Product();
                if (reader.Read())
                {
                    product.ProductID = reader.GetInt32(0);
                    product.Name = reader.GetString(1);
                    if (reader.IsDBNull(2))
                    {
                        product.Color = string.Empty;
                    }
                    else
                    {
                        product.Color = reader.GetString(2);
                    }
                    product.StandardCost = reader.GetDecimal(3);
                    product.ListPrice = reader.GetDecimal(4);
                    if (reader.IsDBNull(5))
                    {
                        product.Weight = 0.0m;
                    }
                    else
                    {
                        product.Weight = reader.GetDecimal(5);
                    }
                }
                reader.Close();
                cn.Close();

                return product;
            }
        }

        #endregion
    }
}
このプロジェクトでは構成ファイルは必要ありません。
3.WCFサービスホストの作成
ソリューションエクスプローラで、ソリューションを右クリック→[Add]→[New Project]でプロジェクトを新規作成します。名前はWCFSample.WPFHostとします。
Referencesフォルダを右クリックして、[AddReference]を選択肢、WCFSample.ProductServiceプロジェクトへの参照を追加してください。
次に、WCFサービスをホストするクラスを作成します。App.xaml内のStartupUriをWindow1.xamlからProductServiceHost.xamlに変更しておきます。サービスのオープン、クローズを行う、Window1.xamlをProductServiceHost.xamlにファイル名を変更し、次のように編集します。
以下ProductServiceHost.xamlの中身です。
<Window x:Class="WCFSample.WPFHost.ProductServiceHost"
    xmlns="http://schemas.microsoft.com/winfx/2006/xaml/presentation"
    xmlns:x="http://schemas.microsoft.com/winfx/2006/xaml"
    Title="SerrviceController" SizeToContent="WidthAndHeight">

    <Grid>
        <Grid.RowDefinitions>
            <RowDefinition />
            <RowDefinition />
        </Grid.RowDefinitions>
        <Grid.ColumnDefinitions>
            <ColumnDefinition />
            <ColumnDefinition />
        </Grid.ColumnDefinitions>
        <Button x:Name="btnStart" Grid.Row="0" Grid.Column="0" Content="Start" Margin="15" Width="50" Click="btnStart_Click"  />
        <Button x:Name="btnStop" Grid.Row="0" Grid.Column="1" Content="Stop" Margin="15" Width="50" Click="btnStop_Click" IsEnabled="False"/>
        <Label x:Name="lblState" Grid.Row="1" Grid.Column="0" Grid.ColumnSpan="2" Content="サービスは開始されていません." />
    </Grid>
</Window>
コードビハインドファイルProductServiceHost.xaml.csを次のように編集します。
using System;
using System.Collections.Generic;
using System.Linq;
using System.Text;
using System.Windows;
using System.Windows.Controls;
using System.Windows.Data;
using System.Windows.Documents;
using System.Windows.Input;
using System.Windows.Media;
using System.Windows.Media.Imaging;
using System.Windows.Navigation;
using System.Windows.Shapes;
using System.ServiceModel;

namespace WCFSample.WPFHost
{
    /// <summary>
    /// Interaction logic for ProductServiceHost.xaml
    /// </summary>
    public partial class ProductServiceHost : Window
    {
        ServiceHost _host = new ServiceHost(typeof(WCFSample.ProductService.ProductService));
        public ProductServiceHost()
        {
            InitializeComponent();
        }

        private void btnStart_Click(object sender, RoutedEventArgs e)
        {
            _host.Open();
            lblState.Content = "サービス中...";
            btnStart.IsEnabled = false;
            btnStop.IsEnabled = true;
        }

        private void btnStop_Click(object sender, RoutedEventArgs e)
        {
            _host.Close();
            lblState.Content = "サービス停止";
            btnStop.IsEnabled = false;
            btnStart.IsEnabled = true;
        }
    }
}
app.configを編集します。【ユーザID】,【パスワード】など、DB接続文字列は環境に合わせて変更してください。basicHttpBindingでサービスを開始します。使用するaddressはhttp://localhost:8056/ProductServiceで、メタ情報用のアドレスにhttp://localhost:8056/ProductService/Mexを使用するように構成してあります。
<?xml version="1.0" encoding="utf-8" ?>
<configuration>
  <connectionStrings>
    <add name="AdventureWorksConnection" connectionString="Data Source=.\SQLEXPRESS;Initial Catalog=AdventureWorks;User ID=WCFUser;Password=P@ssw0rd"/>
  </connectionStrings>
  <system.web>
    <compilation debug="true" />
  </system.web>
  <system.serviceModel>
    <services>
      <service name="WCFSample.ProductService.ProductService" behaviorConfiguration="ProductServiceBehavior">
        <endpoint address="http://localhost:8056/ProductService" binding="basicHttpBinding"
          bindingConfiguration="" contract="WCFSample.ProductService.IProductService" />
      </service>
    </services>
    <behaviors>
      <serviceBehaviors>
        <behavior name="ProductServiceBehavior">
          <serviceMetadata httpGetEnabled="true" httpGetUrl="http://localhost:8056/ProductService/Mex" />
          <serviceDebug includeExceptionDetailInFaults="true" />
        </behavior>
      </serviceBehaviors>
    </behaviors>
  </system.serviceModel>
</configuration>
この段階で動かすことができますが、Vista上ではhttpプロトコルでポートを開くためにアクセス許可を割り当てる必要があります。そのほかのOSで使用している場合にアクセス権がないためエラーが発生する場合は以下のページを参照してください。
-Configuring HTTP and HTTPS
http://msdn2.microsoft.com/en-us/library/ms733768.aspx
http://msdn.microsoft.com/ja-jp/library/ms733768.aspx (日本語)
動作環境したVista環境ではコマンドプロンプトをAdministrator権限で起動し、次のように実行して、アクセス許可をユーザに付与しました。userの記述は環境によって異なります。
netsh http add urlacl url=http://+:8056/ProductService user=マシン名\ユーザ名
Admin権限で起動する場合は、[All Programs]→[Accessories]と展開して、Command Promptを右クリックして[Run as Administrator]を選択します。
4.クライアントプロジェクトの作成
4.1プロキシクラスの作成
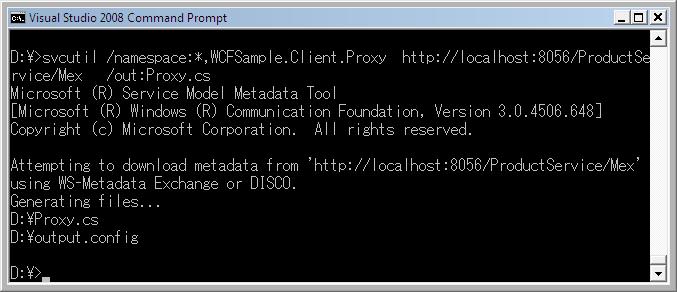
3で作成したホストプログラムを起動して、Proxyクラスを作成します。コマンドは
Visual Studio 2008 Command Promptを起動して、コマンドを打ちます。(下図参照)
svcutil /namespace:*,WCFSample.Client.Proxy http://localhost:8056/ProductService/Mex /out:Proxy.cs
4.2 クライアントプロジェクトの作成
ソリューションエクスプローラで、ソリューションを右クリック→[Add]→[New Project]でプロジェクトを新規作成します。名前はWCFSample.ConsoleClientとします。
次にクライアントプログラムを作成します。内容は以前のサンプルと同じです。
using System;
using System.Collections.Generic;
using System.Text;
using WCFSample.Client.Proxy;

namespace WCFSample.ConsoleClient
{
    class Program
    {
        static void Main(string[] args)
        {
            System.Console.WriteLine("WCFサービスホストを起動したら、キーを入力して下さい。");
            System.Console.ReadLine();

            ProductServiceClient proxy = new WCFSample.Client.Proxy.ProductServiceClient("BasicHttpBinding_ProductService");
            int[] productIDs = proxy.GetProductIDs();

            foreach (int productID in productIDs)
            {
                Console.WriteLine("Product ID: " + productID);
                Product product = proxy.GetProductByID(productID);
                Console.WriteLine("Name: " + product.Name);
                Console.WriteLine("Color: " + product.Color);
                Console.WriteLine("ListPrice: " + product.ListPrice);

            }
            proxy.Close();

            Console.WriteLine("終了するにはなにかキーを押してください。");
            Console.ReadLine();
        }
    }
}
次の構成ファイルを編集します。(プロキシクラス作成時に作成されたout.configを使うと、クライアントの構成ファイルは簡単に作成できます。)
<?xml version="1.0" encoding="utf-8" ?>
<configuration>
  <system.serviceModel>
    <client>
      <endpoint address="http://localhost:8056/ProductService" binding="basicHttpBinding"
          bindingConfiguration="BasicHttpBinding_ProductService" contract="WCFSample.Client.Proxy.ProductService"
          name="BasicHttpBinding_ProductService" />
    </client>
    <bindings>
      <basicHttpBinding>
        <binding name="BasicHttpBinding_ProductService" />
      </basicHttpBinding>
    </bindings>
  </system.serviceModel>
</configuration>
5.実行結果
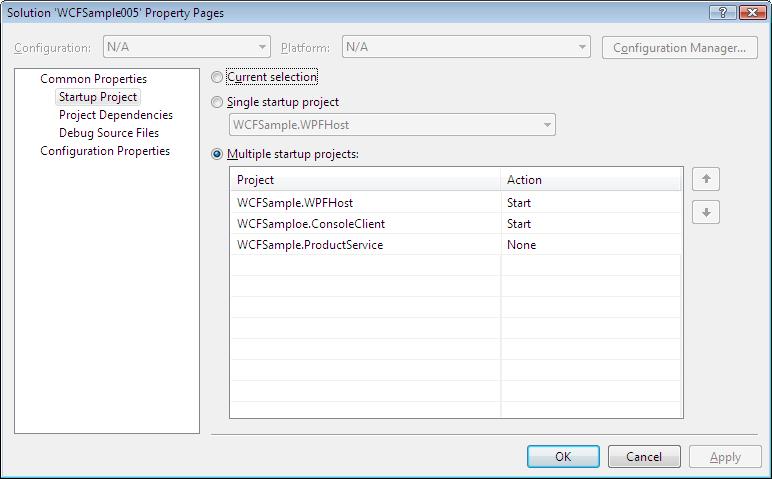
WCFSample005のプロパティを開き、下図のようにMulti Startup に設定した後実行します。
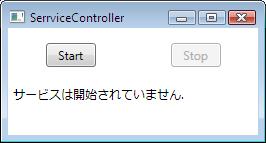
ホスト(Startを押すと開始)
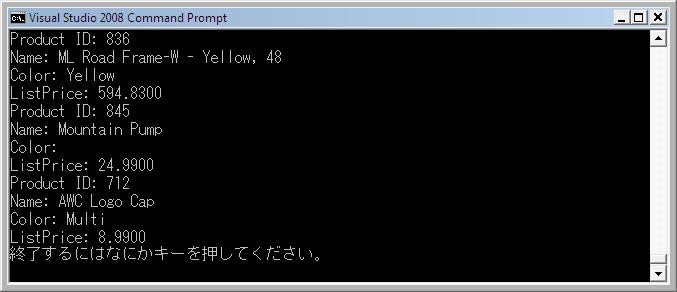
クライアント実行結果(ホストを開始してからEnterを教えて開始します。)
6お土産
プロジェクトファイルです。よかったら使ってください。(本当は会社とかで、細かいこと忘れたときの自分用です。)DB接続文字列は適当な文字列で編集してください。
おかしい点がありましたら、ご指摘お願いいたします。