前回、[Sitecore CSM]コマンドテンプレートを作成してみるではSitecore.Context.ClientPage.ClientResponse.Input を使用してシンプルな入力フォームをもつコマンドテンプレートを作成してみました。
今回は カスタムWebフォーム(aspxページ) を使用する コマンドテンプレートを作成してみます。
今回作成するコマンドテンプレートは Data Definition Cookbook のサンプルを参考にしています。
検証環境
- Sitecore CMS 6.6 Service Pack 1
- .NET 4.0
1.コマンドクラスの作成
CommandTemplate を挿入オプションから選択したときに実行するコマンドクラスを定義します今回は NewFolder というコマンドクラスを作成しました。コマンドクラスは Sitecore.Shell.Framework.Commands.Command クラスを継承し、 Execute メソッドをオーバーライドして実行する処理を実装します。今回はプログラムの中で、 /sitecore modules/shell/NewFolder.aspx ページをダイアログで表示します。ダイアログを閉じたら(args.IsPostBack = false) 作成したアイテムをコンテンツエディターで表示しています。
using System;
using System.Collections.Generic;
using System.Linq;
using System.Web;

namespace SCSupport.Core
{
    // ASPXファイルを使用するCommandTemplateのサンプル
    // UIとして /sitecore modules/shell/NewFolder.aspx を使用します。
    public class NewFolder : Sitecore.Shell.Framework.Commands.Command
    {
        public override void Execute(Sitecore.Shell.Framework.Commands.CommandContext context)
        {
            if (context.Items.Length == 1)
            {
                Sitecore.Data.Items.Item item = context.Items[0];
                System.Collections.Specialized.NameValueCollection parameters =
                new System.Collections.Specialized.NameValueCollection();
                parameters["id"] = item.ID.ToString();
                parameters["database"] = item.Database.Name;
                Sitecore.Context.ClientPage.Start(this, "Run", parameters);
            }
        }
        protected void Run(Sitecore.Web.UI.Sheer.ClientPipelineArgs args)
        {
            if (args.IsPostBack)
            {
                if ((!String.IsNullOrEmpty(args.Result)) && args.Result != "undefined")
                {
                    Sitecore.Context.ClientPage.SendMessage(this, "item:load(id=" + args.Result + ")");
                }
            }
            else
            {
                Sitecore.Text.UrlString url = new Sitecore.Text.UrlString("/sitecore modules/shell/NewFolder.aspx");
                url.Append("id", args.Parameters["id"]);
                url.Append("database", args.Parameters["database"]);
                // window.returnValue にセットした値をargs.Resultで取得できる
                Sitecore.Context.ClientPage.ClientResponse.ShowModalDialog(url.ToString(), true);
                // trueを指定することで 後続のプロセッサーがダイアログが閉じるのを待機しないようにする
                args.WaitForPostBack(true);
            }
        }
    }
}
2. コマンドの定義を作成
App_Config配下の Commands.config に作成したコマンドクラスを実行するためのコマンドを定義します。今回は以下のようにコマンドの定義を作成しました。
<command name="sample:contenteditor:newfolder" type="SCSupport.Core.NewFolder, SCSupport"/>
3.NewFolder.aspx の作成
コマンドクラスで参照するカスタムフォーム画面を作成します。今回は 下記のように NewFolder.aspx を /sitecore modules/shell/NewFolder.aspx に作成しました。
NewFolder.aspx の実装は次のようになります。
<%@ Page Language="C#" AutoEventWireup="true" CodeBehind="NewFolder.aspx.cs" Inherits="SCSupport.sitecore_modules.Shell.NewFolder" %>

<!DOCTYPE html PUBLIC "-//W3C//DTD XHTML 1.0 Transitional//EN" "http://www.w3.org/TR/xhtml1/DTD/xhtml1-transitional.dtd">
<html xmlns="http://www.w3.org/1999/xhtml">
<head runat="server">
    <script language="javascript" type="text/javascript">
        function onClose() {
            // window.returnValue で コマンドクラスに作成したアイテムのIDが渡される。
            window.returnValue = form1.hidCreatedId.value;
            window.close();
        }
        function onCancel() {
            if (confirm("Are you sure you want to cancel?")) {
                window.close();
            }
            window.event.cancelBubble = true;
            return false;
        }
    </script>
    <base target="_self" />
</head>
<body>
    <form id="form1" runat="server">
    <div>
        <asp:TextBox ID="txtName" runat="server" /><br />
        <asp:CheckBox ID="chkCopyInsertOptions" Checked="true" runat="server" Text="Copy Insert Options" />
        <asp:CheckBox ID="chkCopyInsertRules" Checked="true" runat="server" Text="Copy Insert Rules" /><br />
        <asp:Button runat="server" ID="btnCreate" Text="Create" />
        <asp:Button runat="server" ID="btnCancel" Text="Cancel" OnClientClick="onCancel();" />
        <asp:Button runat="server" ID="btnDone" Text="Done" OnClientClick="onClose();" Visible="false" /><br />
        <input type="hidden" runat="server" id="hidCreatedId" /><br />
    </div>
    </form>
</body>
</html>
コードビハインドファイル NewFolder.aspx.cs の実装は次のようになります。コードビハインドでは単純に フォルダー型のアイテムを作成し、親アイテムの挿入ルールと挿入オプションの設定をコピーしています。作成したアイテムのID は window.returnValue に設定して コマンドクラスの Result プロパティに渡されるようにしています。
using System;
using System.Collections.Generic;
using System.Linq;
using System.Web;
using System.Web.UI;
using System.Web.UI.WebControls;

namespace SCSupport.sitecore_modules.Shell
{
    public partial class NewFolder : System.Web.UI.Page
    {
        protected void Page_Load(object sender, EventArgs e)
        {
            // クエリ文字列から database パラメータ取得
            string dbName = Sitecore.Web.WebUtil.GetQueryString("database");
            Sitecore.Data.Database db = Sitecore.Configuration.Factory.GetDatabase(dbName);
            // クエリ文字列から 親アイテムのID取得
            string parentID = Sitecore.Web.WebUtil.GetQueryString("id");
            Sitecore.Data.Items.Item parent = db.GetItem(parentID);

            if (String.IsNullOrEmpty(hidCreatedId.Value) && (!String.IsNullOrEmpty(txtName.Text)))
            {
                // ポストバック時の処理
                // チェックボックスを選択不可にする
                chkCopyInsertOptions.Enabled = false;
                chkCopyInsertRules.Enabled = false;
                // フォルダデータテンプレート取得
                Sitecore.Data.Items.TemplateItem template = Sitecore.Context.ContentDatabase.Templates[Sitecore.TemplateIDs.Folder];
                // フォルダー型のアイテムを親アイテムのサブアイテムとして作成。
                Sitecore.Data.Items.Item item = parent.Add(txtName.Text, template);

                // クローズボタンした押せないようにする。
                txtName.Enabled = false;
                btnDone.Visible = true;
                btnCreate.Visible = false;
                btnCancel.Visible = false;
                // 作成したアイテムのIDを 隠しフィールドに設定
                hidCreatedId.Value = item.ID.ToString();
                // 挿入ルール、挿入オプションを必要に応じてコピーする。
                if (chkCopyInsertOptions.Checked || chkCopyInsertRules.Checked)
                {
                    item.Editing.BeginEdit();
                    if (chkCopyInsertOptions.Checked)
                    {
                        item.Fields[Sitecore.FieldIDs.Branches].Value =
                        parent[Sitecore.
                        FieldIDs.Branches];
                    }
                    if (chkCopyInsertRules.Checked)
                    {
                        item.Fields["__insert rules"].Value = parent["__insert rules"];
                    }
                    item.Editing.EndEdit();
                }
            }
            else
            {
                // 初期表示(GET)時に挿入ルールと挿入オプションが親アイテムに設定されているか
                // チェックし、未設定ならチェックボックスでチェックできないようにする。
                if (String.IsNullOrEmpty(parent[Sitecore.FieldIDs.Branches]))
                {
                    chkCopyInsertOptions.Enabled = false;
                    chkCopyInsertOptions.Checked = false;
                }
                if
                (String.IsNullOrEmpty(parent["__insert rules"]))
                {
                    chkCopyInsertRules.Enabled = false;
                    chkCopyInsertRules.Checked = false;
                }
            }
        }
    }
}
4.コマンドテンプレート定義アイテムの作成
コマンドクラス、コマンドの定義、カスタム入力フォームの準備ができました。コマンドテンプレートの定義アイテムを作成します。テンプレート/ユーザー定義 アイテムを選択し、 挿入オプションからテンプレートから挿入を選択します。下図のようにテンプレートから挿入ダイアログが表示されます。/テンプレート/システム/ブランチ/コマンドテンプレート を選択し、名前を NewFolder としてアイテムを作成します。

アイテムのコマンドフィールドに 作成したコマンド名と id=$ParentID パラメーターを設定します(下図参照)。 id=$ParentID を設定することでコマンドクラスの親アイテムのIDが渡されるようになります。

5.動作確認
作成したコマンドテンプレートを使用してみます。NewFolder コマンドテンプレートを使用する場合は アイテムの挿入オプションにあらかじめ設定されている必要があります。今回は ホームアイテムの挿入オプションに NewFolder コマンドテンプレートを設定しました。
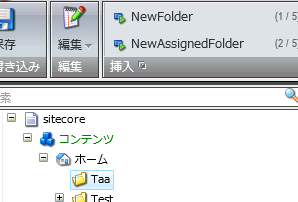
下図のようにホームアイテムを選択し、 挿入グループから NewFolder を選択します。
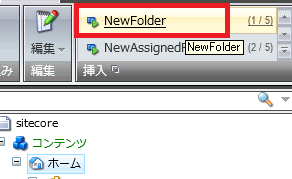
すると、カスタムフォーム画面が表示されます。
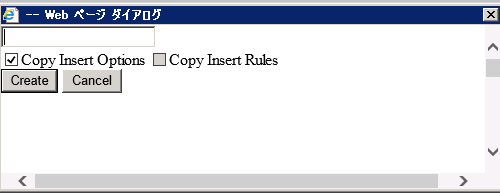
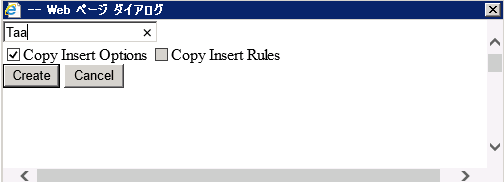
作成する フォルダー型アイテム の名前をテキストボックスに入力して、 Create ボタンをクリックします。
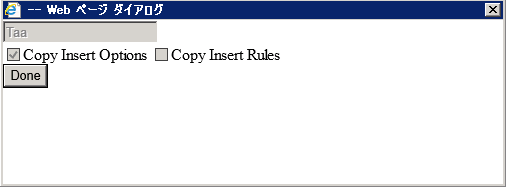
アイテムが作成され 入力フォームやチェックボックスが読み取り専用になります。 Done ボタンをクリックします。
フォーム画面が閉じ、作成した アイテムがコンテンツエディター上で選択された状態になります。挿入グループを見ると 親アイテム(今回はホームアイテム)の挿入オプションがコピーされていることを確認できます。
6.まとめ
説明は以上です。今回はデータ定義クックブックのサンプルを参考にして、 カスタムフォームを使用する コマンドテンプレートを作成してみました。