作成環境は次のとおり
- OS::Visata
- IDE:: Visual Studio 2008 Professional
- .NET::3.5
- サーバ:ローカルIIS7.0
- クライアント:Windows Console アプリケーション
サンプルの作成用のデータベースにAdventureWorksを使用しています。
1.プロジェクトの作成
空のソリューションを作成し、プロジェクトを新規作成します。プロジェクトテンプレートはWCF Service Libraryを選択しました。
2.サーバプログラムの作成
2.1データコントラクトの作成
データコントラクトを作成します(下記参照)。[DataContract]でそのクラスがデータコントラクトだということを設定します。クライアントに公開するメンバには[DataMember]アトリビュートをセットします。
using System;
using System.Collections.Generic;
using System.Linq;
using System.Text;
using System.Runtime.Serialization;

namespace WCFSample001.Production
{
    [DataContract]
    public class Product
    {
        [DataMember]
        public int ProductID;

        [DataMember]
        public string Name;

        [DataMember]
        public string Color;

        [DataMember]
        public decimal StandardCost;

        [DataMember]
        public decimal ListPrice;

        [DataMember]
        public decimal Weight;
    }
}
2.2サービスコントラクトの作成および実装
サービスコントラクトとサービスを実装するクラスを作成します。プロジェクトに新規追加項目字にWCF Serviceを選択してサービスクラスと実装クラスを作成します。
サービスコントラクトは次のように定義しました。サービスコントラクトであることを宣言するために[ServiceContract],クライアントに公開するメソッドには[OperationContract]をそれぞれインターフェースとメソッドの宣言に付加します。
using System;
using System.Collections.Generic;
using System.Linq;
using System.Runtime.Serialization;
using System.ServiceModel;
using System.Text;

namespace WCFSample001.Production
{
    // NOTE: If you change the interface name "IProductService" here, you must also update the reference to "IProductService" in App.config.
    [ServiceContract]
    public interface IProductService
    {
        [OperationContract]
        List<int> GetProductIDs();

        [OperationContract]
        Product GetProductByID(int productID);

        [OperationContract]
        bool ChangeListPrice(int productID, decimal newListPrice);
    }
}
サービスコントラクトの実装を行います。次のように実装しました。
using System;
using System.Collections.Generic;
using System.Linq;
using System.Runtime.Serialization;
using System.ServiceModel;
using System.Text;
using System.Data;
using System.Data.Common;
using System.Data.SqlClient;
using System.Configuration;

namespace WCFSample001.Production
{
    // NOTE: If you change the class name "ProductService" here, you must also update the reference to "ProductService" in App.config.
    public class ProductService : IProductService
    {


        private DbConnection CreateConnection()
        {
            return new SqlConnection(System.Configuration.ConfigurationManager.ConnectionStrings["AdventureWorksConnection"].ConnectionString);
        }
        #region IProductService Members

        public List<int> GetProductIDs()
        {
            List<int> productIDs = new List<int>();
            using (DbConnection cn = CreateConnection())
            {
                DbCommand cmd = cn.CreateCommand();
                cmd.CommandText = @"SELECT ProductID FROM Production.Product";
                cmd.CommandType = CommandType.Text;

                cn.Open();
                DbDataReader reader = cmd.ExecuteReader();
                while (reader.Read())
                {
                    productIDs.Add(reader.GetInt32(0));
                }
                reader.Close();
                cn.Close();

                return productIDs;
            }
        }

        public Product GetProductByID(int productID)
        {
            using (DbConnection cn = CreateConnection())
            {
                DbCommand cmd = cn.CreateCommand();
                cmd.CommandType = CommandType.Text;
                cmd.CommandText = @"SELECT ProductID, Name, Color, StandardCost, ListPrice, Weight
                                      FROM  Production.Product
                                     WHERE ProductID = " + productID.ToString();
                cn.Open();
                DbDataReader reader = cmd.ExecuteReader(CommandBehavior.SingleRow);
                Product product = new Product();
                if (reader.Read())
                {
                    product.ProductID = reader.GetInt32(0);
                    product.Name = reader.GetString(1);
                    if (reader.IsDBNull(2))
                    {
                        product.Color = string.Empty;
                    }
                    else
                    {
                        product.Color = reader.GetString(2);
                    }
                    product.StandardCost = reader.GetDecimal(3);
                    product.ListPrice = reader.GetDecimal(4);
                    if (reader.IsDBNull(5))
                    {
                        product.Weight = 0.0m;
                    }
                    else
                    {
                        product.Weight = reader.GetDecimal(5);
                    }
                }
                reader.Close();
                cn.Close();

                return product;
            }
        }

        public bool ChangeListPrice(int productID, decimal newListPrice)
        {
            using (DbConnection cn = CreateConnection())
            {
                StringBuilder builder = new StringBuilder();
                builder.Append(" UPDATE Production.Product ");
                builder.Append("    SET ListPrice = " + newListPrice.ToString());
                builder.Append(" WHERE ProductID = " + productID.ToString());

                DbCommand cmd = cn.CreateCommand();
                cmd.CommandType = CommandType.Text;
                cmd.CommandText = builder.ToString();

                cn.Open();

                int result = cmd.ExecuteNonQuery();

                return (result == 1);
            }
        }

        #endregion
    }
}
4.WCFサービスの設定
プロジェクトに新規項目を追加します。テキストのテンプレートを選択肢、ProductService.svcという名前で保存し、以下のように編集します。
<%@ServiceHost Service="WCFSample001.Production.ProductService" Language="C#" %>
次にWeb.configを新規作成し、次の内容で編集します。ツールでも設定できますが、手動で行います。【ログインユーザ】,【パスワード】など接続文字列は環境によって変わります。
<?xml version="1.0" encoding="utf-8" ?>
<configuration>
  <connectionStrings>
    <add name="AdventureWorksConnection" connectionString="Data Source=.\SQLEXPRESS;Initial Catalog=AdventureWorks;User ID=【ログインユーザ】;Password=【パスワード】;/>
  </connectionStrings>
  <system.web>
    <compilation debug="true" />
  </system.web>
  <!-- When deploying the service library project, the content of the config file must be added to the host's
  app.config file. System.Configuration does not support config files for libraries. -->
  <system.serviceModel>
    <services>
      <service behaviorConfiguration="WCFSample001.ProductServiceBehavior"
        name="WCFSample001.Production.ProductService">
        <endpoint address="" binding="basicHttpBinding" contract="WCFSample001.Production.IProductService">
        </endpoint>
      </service>
    </services>
    <behaviors>
      <serviceBehaviors>
        <behavior name="WCFSample001.ProductServiceBehavior">
          <serviceMetadata httpGetEnabled="true" />
        </behavior>
      </serviceBehaviors>
    </behaviors>
  </system.serviceModel>
</configuration>
5.IISへWCFサービスの登録
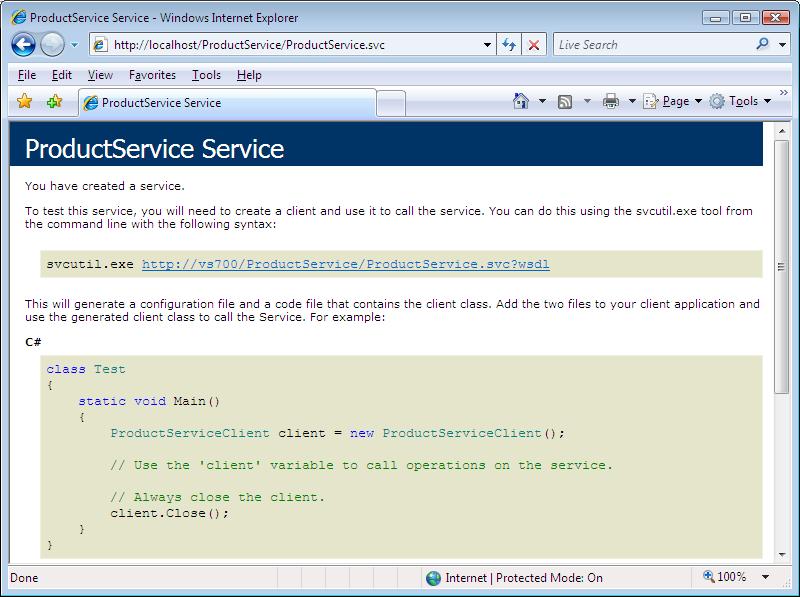
Internet Information Managerを起動し、Default Websiteを右クリックし、[Add Application..]を選択します。表示されたダイアログのAliasにProductService,Physical PathにWCFサービスプロジェクトのフォルダ(ProductService.svcのあるフォルダ)のパスを指定してOKボタンをクリックします。そして、WCFサービスのコンパイルされたアセンブリをDebugフォルダではなくbinフォルダ直下にコピーします。あとは、svcファイルにアクセスして次のように表示されたら成功です。(パスは環境によって変化します。)リンクに?wsdlを漬けると、WSDLで結果が表示されます。
6.クライアントの作成
6.1Proxyクラスの生成
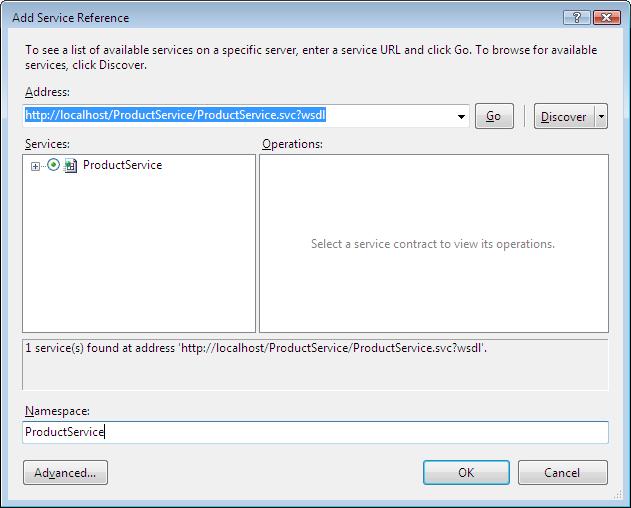
ソリューションを右クリックし、プロジェクトを新規作成します。プロジェクトのテンプレートではWindows Console Applicationを選択します。プロジェクトの新規作成後、プロジェクトを右クリック→[Add Service Rerefence]を選択、画面上でhttp://localhost/ProductService/ProductService.svc?wsdlを入力して[Go]ボタンをクリックし、サービスを表示します。ネームスペースを設定して[OK]ボタンをクリックします。成功すればapp.configが追加され、Proxyクラスが生成されます。
app.configは次のようにクライアント用の設定が追加されていると思います。【サーバ名】は環境によって異なります。
<?xml version="1.0" encoding="utf-8" ?>
<configuration>
    <system.serviceModel>
        <bindings>
            <basicHttpBinding>
                <binding name="BasicHttpBinding_IProductService" closeTimeout="00:01:00"
                    openTimeout="00:01:00" receiveTimeout="00:10:00" sendTimeout="00:01:00"
                    allowCookies="false" bypassProxyOnLocal="false" hostNameComparisonMode="StrongWildcard"
                    maxBufferSize="65536" maxBufferPoolSize="524288" maxReceivedMessageSize="65536"
                    messageEncoding="Text" textEncoding="utf-8" transferMode="Buffered"
                    useDefaultWebProxy="true">
                    <readerQuotas maxDepth="32" maxStringContentLength="8192" maxArrayLength="16384"
                        maxBytesPerRead="4096" maxNameTableCharCount="16384" />
                    <security mode="None">
                        <transport clientCredentialType="None" proxyCredentialType="None"
                            realm="" />
                        <message clientCredentialType="UserName" algorithmSuite="Default" />
                    </security>
                </binding>
            </basicHttpBinding>
        </bindings>
        <client>
            <endpoint address="http://【サーバ名】/ProductService/ProductService.svc"
                binding="basicHttpBinding" bindingConfiguration="BasicHttpBinding_IProductService"
                contract="ProductService.IProductService" name="BasicHttpBinding_IProductService" />
        </client>
    </system.serviceModel>
</configuration>
6.2 Mainプログラムの実装
デフォルトで作成されているProgram.csを次のように編集して完了。このときSystem.ServiceModelの参照が設定されていないばあは、参照設定に追加しておきます。
using System;
using System.Collections.Generic;
using System.Linq;
using System.Text;
using System.ServiceModel;
using WCFSample001.Client.ProductService;

namespace WCFSample001.Client
{
    class Program
    {
        static void Main(string[] args)
        {
            ProductServiceClient proxy = new ProductServiceClient("BasicHttpBinding_IProductService");

            int[] productIDs = proxy.GetProductIDs();

            foreach (int productID in productIDs)

            {
                Console.WriteLine("Product ID: " + productID);
                Product product = proxy.GetProductByID(productID);
                Console.WriteLine("Name: " + product.Name);
                Console.WriteLine("Color: " + product.Color);
                Console.WriteLine("ListPrice: " + product.ListPrice);

            }
            proxy.Close();

            Console.WriteLine("終了するにはなにかキーを押してください。");
            Console.ReadLine();
        }
    }
}
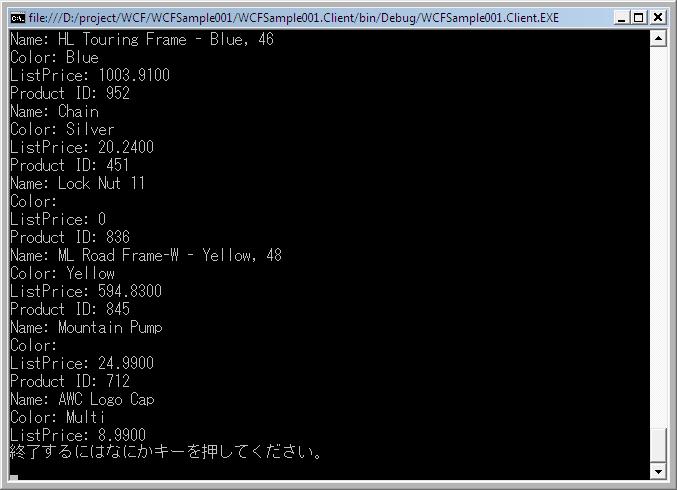
7. クライアントプログラム実行結果
クライアントプログラムをコンパイル後、実行して処理が成功すれば次のようにコンソールが表示されます。
以上で完了です。WCFは宣言的なプログラム方法で通信の方法を抽象化してくれます。WPFのような派手さはありませんが、WCFがマイクロソフトの独自実装、オープンなWebサービスなど宣言を変えるだけで、柔軟に対応できるすばらしい技術で、とても好意的にWCFを受け取っています。例えば、通信対象がレガシーなWebサービスだとしても、クライアントまでそれに引きずられたプログラムの作成をする必要がなく、また、WCFが対応していれば、ひとつの最新のテクノロジーを採用したWCFサーバ,WCFクライアントで、ほかの複数の通信方式にも対応することができます。まだまだはブレークしていませんが、このサイトでは積極的にWCFを応援していきたいと思います。