jsRenderはjavascriptで作成されたマークアップのテンプレートエンジンです。jsRenderのオンラインのデモや使い方なんかは下記の本家のURLを参照してください。本記事では jsRender のテンプレートで使用できるfor, ifといった条件分岐、ループだけでなく、別の場所で定義したテンプレートの定義を使用してマークアップを生成できるinclude など多くのタグをで使ったサンプルを作成しています。
タグに関して
http://www.jsviews.com/#jsrapi
サンプル
http://www.jsviews.com/#samples/jsr
get started
http://www.jsviews.com/#getstarted
さっそくですが、サンプルを下記に記載します。テンプレートは scriptタグで type="text/x-jsrender" で指定している部分になります。自分用のメモを記載するとテンプレートの中で #data はコンテキストオブジェクトを表します。 ~root は テンプレートをレンダリングするために使用しているオブジェクトのルートのオブジェクトを表します。サブテンプレート内で{{include tmpl=#content /}}と記載しているのは親テンプレート側で {{include }} で囲まれたコンテンツをサブテンプレート内で描画するための記述方法になります。
<!DOCTYPE html>
<html xmlns="http://www.w3.org/1999/xhtml">
<head>
    <!-- http://www.jsviews.com/#jsrapi がわかりやすい -->
    <meta http-equiv="Content-Type" content="text/html; charset=utf-8" />
    <title></title>
    <script type="text/javascript" src="Scripts/jquery-2.1.0.js"></script>
    <script type="text/javascript" src="Scripts/jsrender.js"></script>
    <script type="text/javascript">
        function person(firstname, lastname, zip, street1, street2, htmlmsg, url) {
            this.last = lastname;
            this.first = firstname;
            this.address = {};
            this.address.zip = zip;
            this.address.street1 = street1;
            this.address.street2 = street2;
            this.htmlmsg = htmlmsg;
            this.url = url;
        }
        $(function () {
            var persons = [];
            persons.push(new person('太郎', '東京', '111-0000', '東京都', '葛飾区', '<h3 style="background-color:yellow;">よろしくお願いします</h3>', 'http://www.google.co.jp'));
            persons.push(new person('花子', '埼玉', '112-0000', '埼玉県', 'さいたま市', null, 'http://www.bing.com/'));
            var footers = [];
            footers.push(new person('Footer1', 'Footer2', 'footer3-1', 'footer3-2', 'footer3-3', '<h1>Footer</h1>', 'http://www.yahoo.co.jp'));
            var data = {};
            data.header = {};
            data.header.first = "FirstName";
            data.header.last = "LastName";
            data.header.address = "Address";
            data.header.message = "Message";
            data.header.url = "HomePage";
            data.persons = persons;
            data.footers = footers;
            var html = $("#dataTemplate").render(data);
            $("#personList").html(html);
        });

    </script>
</head>
<body>
    <div id="personList">

    </div>
    <script id="dataTemplate" type="text/x-jsrender">
    {{!-- jsRender 内の コメント  --}}
    <table border="1">
        <thead>
            <tr>
                {{include tmpl="#headerTemplate" }}
                    <th>{{>header.first}}</th>
                    <th>{{>header.last}}</th>
                    <th>{{>header.address}}</th>
                    <th>{{>header.message}}</th>
                    <th>{{>~root.header.url}}</th>
                {{/include}}
            </tr>
        </thead>
        <tbody>
            {{for persons tmpl="#rowTemplate" /}}
        </tbody>
        <tfoot>
            {{for footers}}
                {{include tmpl="#rowTemplate" /}}
            {{/for}}
        </tfoot>
    </table>

    </script>
    <script id="headerTemplate" type="text/x-jsrender">
        {{include tmpl=#content /}}
    </script>
    <script id="rowTemplate" type="text/x-jsrender">
  <tr>
    <td>{{>first}}</td>
    <td>{{>last }}</td>
    <td>
        {{props address}}
            <b>{{>key}}</b>:{{>prop}}<br/>
        {{/props}}
        </td>
        <td>
            {{if htmlmsg}}
                {{:htmlmsg}}
            {{else}}
                <div>empty message</div>
            {{/if}}
        </td>
        <td>
            <a href="{{url: #data.url }}">{{> url}}</a>
        </td>
  </tr>
    </script>
</body>
</html>
上記ページを表示すると、下図のようにjsRenderを使用して マークアップが生成されてページが描画されます。
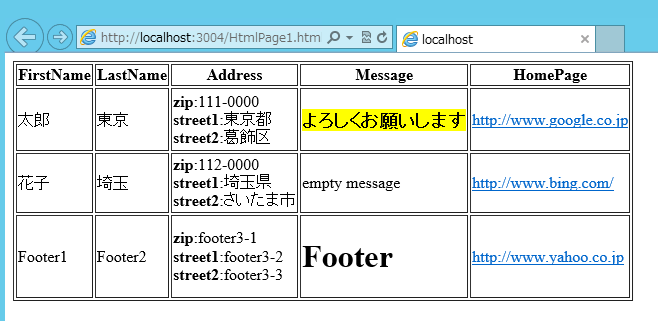
本サンプルでは備忘録として できるだけ多くのタグを使用してjsRender を使用してみました。jsRender ではjavascriptを駆使してテンプレートをjavascriptから生成するといった、より高度な使い方ができますがそのようなサンプルは jsRender の公式のサイトのサンプルやAPIサンプルを参照してください。

さんのコメント: さんのコメント: