Azure Search Serviceを使ってみた Part1 Azure Search Serviceの作成してみるでは、Azure Search サービスをAzure上にセットアップしてみました。この記事では、コンソールプログラムから次のことを行ってみます。
- インデックス定義の作成と削除
- ドキュメントをアップロード
- ドキュメントの検索
サンプルコードを見ていただくとわかりますが、Azure Searchは上記処理を非常に簡単に実装することができます。記事作成にあたり、動作確認は Visual Studio 2013 Update4 で行いました。
1. Visual Studio プロジェクトの作成
Visual Studioを起動して、メニューから ファイル->新規作成->プロジェクト をクリックします。
新しいプロジェクトの作成するダイアログが表示されたら コンソール アプリケーション を選択してプロジェクトを新規作成します。ソリューションを右クリックし、ソリューションの NuGet パッケージの管理 をクリックします。

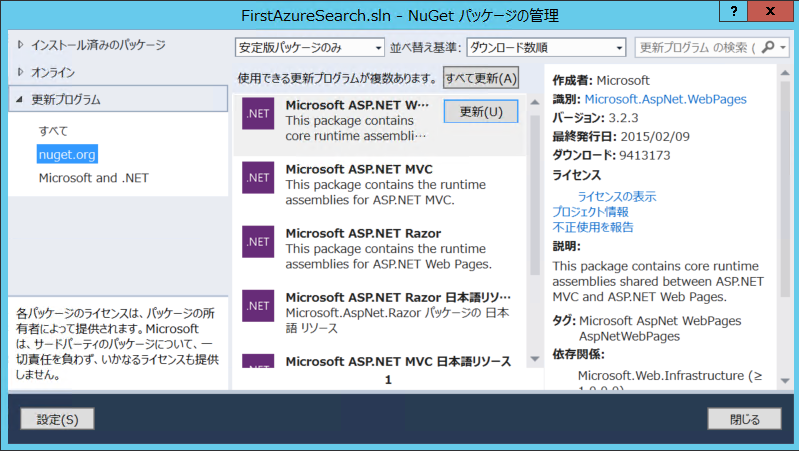
パッケージの管理ダイアログの 左タブで更新プログラム->nuget.org をクリックします。更新可能なパッケージの一覧が表示されますので 下図の中央の すべて更新 をクリックします。これでパッケージが最新化されます。
続いて、 Microsoft.Azure.Search パッケージをインストールします。 NuGetパッケージの管理画面の左でオンラインを選択します。 リリース前のパッケージを含める を選択して、 azure.search で検索します。 下図のように Microsoft Azure Search パッケージが表示されます。インストールをクリックします。

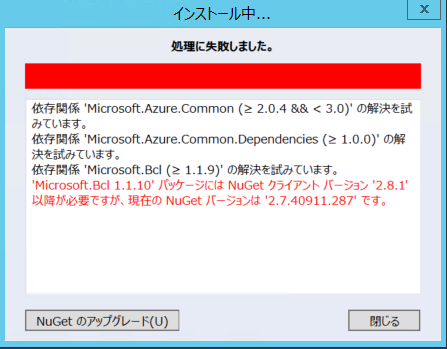
NuGetパッケージ管理マネージャーのバージョンが古いと下図のような画面が表示されます。その場合は下図ダイアログ左下の NuGet のアップグレードボタンをクリックします。
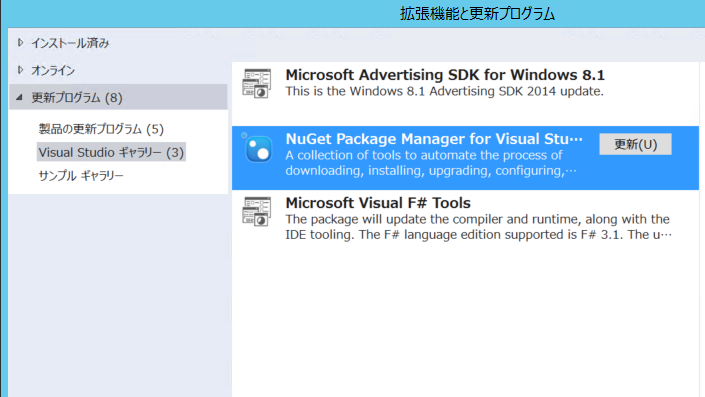
拡張機能と更新プログラムのダイアログが表示されるので、更新プログラムのVisual Studio ギャラリーを選択して NuGet Package Manager for Visual Studio を選択して更新してください。
Visual Studioを再起動して、再度 Microsoft.Azure.Searchパッケージをインストールします。
2. Web.configの編集
サンプルプログラムで使用するSearchサービスの名前と管理キーを構成ファイル(App.config)に設定します。Searchサービス名はSearchサービスを作成するときに指定した名前 https://[Searchサービス名].search.windows.net の部分を記載します。[プライマリ管理キー]はプライマリ管理キーを指定します。
<?xml version="1.0" encoding="utf-8" ?>
<configuration>
    <startup>
        <supportedRuntime version="v4.0" sku=".NETFramework,Version=v4.5" />
    </startup>
  <appSettings>
    <add key="SearchServiceName" value="[Searchサービス名]" />
    <add key="SearchServiceApiKey" value="[プライマリ管理キー]" />
  </appSettings>
</configuration>
3.サンプルプログラムの作成
コンソールプロジェクトにデフォルトで作成されたProgram.cs を編集してインデックスを作成、定義してみます。
まず、Searchサービスで使用するMain 関数は次のようなものになります。_indexNameは作成するインデックスの名前です。Main関数では戦闘で、 Azure Searchサービスへのクライアントである、 SearchServiceClientのインスタンスをApp.configに設定したSearchサービスの名前と管理者キーを使用して生成しています。_searchClient.Indexes.GetClient メソッドを使用して インデックスを表す SearchIndexClientのインスタンスを作成しています。その後、インデックスのスキーマの削除と作成、ドキュメントのアップロード、検索を行っています。それぞれのメソッドの実装については後述します。
class Program
{
    private static SearchServiceClient _searchClient;
    private static SearchIndexClient _indexClient;
    private static string _indexName = "pine4test";
    static void Main(string[] args)
    {
        string searchServiceName = ConfigurationManager.AppSettings["SearchServiceName"];
        string apiKey = ConfigurationManager.AppSettings["SearchServiceApiKey"];

        _searchClient = new SearchServiceClient(searchServiceName, new SearchCredentials(apiKey)); // 検索クライアント初期化
        _indexClient = _searchClient.Indexes.GetClient(_indexName);

        if (DeleteIndex())
        {
            Console.WriteLine("Create index");
            CreateIndex();
            Console.WriteLine("Upload index");
            UploadDocumentWithDocument();
            UploadDocumentWithCustomModel();
            Console.WriteLine("Search Testing");
            SearchDocumentWithCustomModel();

        }
        Console.WriteLine("Press Enter.\n");
        Console.ReadKey();
    }
}
さっそく各メソッドの定義を記載していきます。まずはインデックスのスキーマ定義の削除するメソッドです。Deleteメソッドでは、SearchClient.Indexes.Delete メソッドを使用して_indexNameという名前のインデックスの定義を削除しています。
 private static bool DeleteIndex()
 {
     // 既存のインデックスを削除
     try
     {
         _searchClient.Indexes.Delete(_indexName);
     }
     catch (Exception ex)
     {
         Console.WriteLine("Error deleting index: {0}", ex.Message.ToString());
         return false;
     }

     return true;
 }
続いてインデックスのスキーマ定義をCreateIndexメソッドで次のように行っています。
/// <summary>
/// インデックスをプログラムから作成するサンプルコード
/// Azure PortalのUIからも作成することができます。
/// Json形式については https://msdn.microsoft.com/ja-jp/library/azure/Dn798941.aspx を参照
/// </summary>
private static void CreateIndex()
{
    // 検索インデックスの作成
    try
    {
        var definition = new Index()
        {
            Name = _indexName,
            Fields = new[]
            {
                new Field("id",         DataType.String)         { IsKey = true,  IsSearchable = true,  IsFilterable = true, IsSortable = true, IsFacetable = false, IsRetrievable = true},
                new Field("title",      DataType.String)         { IsKey = false, IsSearchable = true,  IsFilterable = true, IsSortable = true, IsFacetable = false, IsRetrievable = true},
                new Field("summary",    DataType.String)         { IsKey = false, IsSearchable = true,  IsFilterable = true, IsSortable = false,IsFacetable = false, IsRetrievable = true},
                new Field("content",    DataType.String)         { IsKey = false, IsSearchable = true,  IsFilterable = true, IsSortable = false,IsFacetable = false, IsRetrievable = false},
                new Field("memberOnly", DataType.Boolean)        { IsKey = false, IsSearchable = false, IsFilterable = true, IsSortable = false,IsFacetable = false, IsRetrievable = true},
                new Field("categoryName",DataType.String)        { IsKey = false, IsSearchable = true,  IsFilterable = true, IsSortable = true, IsFacetable = true,  IsRetrievable = true},
                new Field("createdBy",  DataType.String)         { IsKey = false, IsSearchable = true,  IsFilterable = true, IsSortable = true, IsFacetable = true,  IsRetrievable = true},
                new Field("createdOn",  DataType.DateTimeOffset) { IsKey = false, IsSearchable = false, IsFilterable = true, IsSortable = true, IsFacetable = true,  IsRetrievable = true},
                new Field("modifiedBy", DataType.String)         { IsKey = false, IsSearchable = true,  IsFilterable = true, IsSortable = true, IsFacetable = true,  IsRetrievable = true},
                new Field("modifiedOn", DataType.DateTimeOffset) { IsKey = false, IsSearchable = false, IsFilterable = true, IsSortable = true, IsFacetable = true,  IsRetrievable = true}
            },
            Suggesters = new[] {
                new Suggester("suggestionByTitle", SuggesterSearchMode.AnalyzingInfixMatching, "title", "summary" )
            }
        };

        _searchClient.Indexes.Create(definition);
    }
    catch (Exception ex)
    {
        Console.WriteLine("インデックス作成でエラー: {0}\r\n", ex.Message.ToString());
    }
}
Fieldクラスでフィールドの詳細な定義をしています。パラメーターの詳細な説明に関しては次のURLを参照してください。
Create Index (Azure Search サービス REST API)
https://msdn.microsoft.com/ja-jp/library/azure/Dn798941.aspx
スキーマの定義が終わったので、実際にドキュメントをSearchサービスにアップロードします。今回のサンプルではUploadDocumentWithDocument という、Searchサービスで提供されている汎用のドキュメントクラスを使用する例と、UploadDocumentWithCustomModel というカスタムのドキュメントを表すクラスを使用してタイプセーフな方法でドキュメントをインスタンス化してアップロードするメソッドを記載しています。
 /// <summary>
 /// 汎用Documentクラスを使用してドキュメントをアップロード
 /// </summary>
 private static void UploadDocumentWithDocument()
 {
     Document doc = new Document();
     doc["id"] = "1";
     doc["title"] = "ID 1 のタイトル";
     doc["summary"] = "ID 1 のサマリ";
     doc["content"] = "ID 1 のコンテンツ本体";
     doc["memberOnly"] = true;
     doc["categoryName"] = "Azure Search";
     doc["createdBy"] = "admin1";
     doc["createdOn"] = DateTimeOffset.Now;
     doc["modifiedBy"] = "admin2";
     doc["modifiedOn"] = DateTimeOffset.Now;

     IList<IndexAction> actions = new []{
         new IndexAction(IndexActionType.Upload, doc)
     };
     var result = _indexClient.Documents.IndexAsync(new IndexBatch(actions)).Result;
     foreach (var item in result.Results)
     {
         if (item.Succeeded)
         {
             Console.WriteLine("Success!! ID:{0}", item.Key);
         }
         else
         {
             Console.WriteLine("Error!! ID:{0} Message:{1}", item.Key, item.ErrorMessage);
         }
     }
 }
 private static void UploadDocumentWithCustomModel()
 {
     CustomModel model = new CustomModel
     {
         Id = "2",
         Title = "ID 2 のタイトル",
         Summary = "ID 2 のサマリー",
         Content = "ID 2 のコンテンツ",
         MemberOnly = false,
         CategoryName = "Azure Search",
         CreatedBy = "admin1",
         CreatedOn = DateTimeOffset.Now,
         ModifiedBy = "admin2",
         ModifiedOn = DateTimeOffset.Now
     };
     IList<IndexAction<CustomModel>> actions = new[]{
         new IndexAction<CustomModel>{ ActionType = IndexActionType.Upload, Document = model }
     };
     var result = _indexClient.Documents.IndexAsync(new IndexBatch<CustomModel>(actions)).Result;
     foreach (var item in result.Results)
     {
         if (item.Succeeded)
         {
             Console.WriteLine("Success!! ID:{0}", item.Key);
         }
         else
         {
             Console.WriteLine("Error!! ID:{0} Message:{1}", item.Key, item.ErrorMessage);
         }
     }
 }
カスタムモデルの定義は次のようにしています。モデルクラスにSerializePropertyNameAsCamelCase 属性を指定して、プロパティの名前からインデックスのフィールドへのマッピングを行う際にプロパティの先頭の文字を小文字にしてマッピングされるようにしています。
[SerializePropertyNamesAsCamelCase]
class CustomModel
{
    public string Id { get; set; }
    public string Title { get; set; }
    public string Summary { get; set; }
    public string Content { get; set; }
    public bool? MemberOnly { get; set; }
    public string CategoryName { get; set; }
    public string CreatedBy { get; set; }
    public DateTimeOffset CreatedOn { get; set; }
    public string ModifiedBy { get; set; }
    public DateTimeOffset ModifiedOn { get; set; }
}
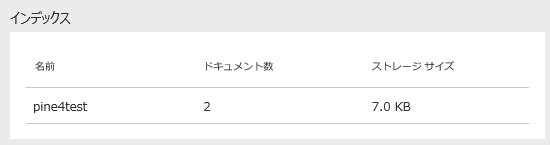
ドキュメントのアップロードが成功すると、下図のようのAzureのポータル画面から登録されたドキュメント数とストレージサイズを確認できます。インデックスを選択してインデックスのスキーマ定義を変更できます(現時点では追加ぐらいしかできないようです)。
アップロードしたドキュメントを検索しているのが次のメソッドです。型パラメーターを指定するSearchClient.Documents.Search<T>を使用して検索結果のドキュメントをCustomModelとして取得しています。型パラメーターなしのSearchメソッドを使用して既定のDocumentクラスを検索結果のドキュメントクラスとして使用することもできます。
/// <summary>
/// ドキュメントの検索
/// https://msdn.microsoft.com/ja-jp/library/azure/dn798927.aspx
/// </summary>
public static void SearchDocumentWithCustomModel()
{
    try
    {
        SearchParameters sp = new SearchParameters() { SearchMode = SearchMode.All };
        var  response = _indexClient.Documents.Search<CustomModel>("*", sp);
        var  result = response.Results;
        foreach (var item in result)
        {
            // contentはIsRetrievableがfalseのため、検索結果のContentプロパティには値は未設定(null)になります。
            Console.WriteLine("ID:{0}, Title:{1}, Content:{2}", item.Document.Id, item.Document.Title, item.Document.Content);
        }
    }
    catch (Exception ex)
    {
        Console.WriteLine("Error querying index: {0}\r\n", ex.Message.ToString());
    }
}
検索に使用できるパラメーターについては次のURLを参照してください。
ドキュメントの検索 (Azure Search Service REST API)
https://msdn.microsoft.com/ja-jp/library/azure/dn798927.aspx
実際にサンプルプログラムを作成すると検索結果が0件になると思います。アップロードしたドキュメントはすぐには検索できません。非同期でドキュメントのインデックスの生成が行われるためです。そのためサンプルコードのようのアップロード直後検索しても検索結果は0件になります。しばらく時間をおいてから検索のメソッドだけ実行するようにしてください。
4.まとめ
この記事ではインデックスを定義して、ドキュメントをアップロードし検索するサンプルコードを記載しました。最初は知識が0の状態で試行錯誤したので苦労しましたが、いざプログラムを作成してみると、インデックスの作成やドキュメントの登録、検索処理は簡単に記述できます。ファセットを作成しりサジェストを作成する機能もあるのでサイト内検索を簡単お手軽に作成できます。インデックス時に使用する辞書はBingの辞書(BingがWebの世界をクロールして日々更新している辞書だったかも?詳細は忘れました)と同じとde:codeで聞いたので、辞書データのメンテナンスも安心できます。
最後に.NETやJavascript, Java等から初めてAzure Searchサービスを使う場合に参考になりそうなリンクを掲載しておきます。
.NET での Azure Search アプリケーションの初めての使用
https://azure.microsoft.com/ja-jp/documentation/articles/search-get-started-dotnet/.NET アプリケーションから Azure Search を使用する方法(こっちは実際には記事作成後、見つけたのですが、とても有用と思われたので紹介)
https://azure.microsoft.com/ja-jp/documentation/articles/search-howto-dotnet-sdk/
Azure上のSQL Database や ドキュメントDBを使用するとさらに簡単にインデックスを作成できるみたいですが、その例に関してはは上記URLを参照してください。
おまけですが、Azure Searchのサジェストの機能を使用するサンプルメソッドも掲載しておきます。Textプロパティに検索候補のSuggestに使用する文字列(要するに検索にヒットしたフィールドの文字列)が設定されます。
 public static void Suggest()
 {
     try
     {
         SuggestParameters sp = new SuggestParameters(){  Top = 10};
         var response = _indexClient.Documents.SuggestAsync("タイト", "suggestionByTitle", sp).Result;
         Console.WriteLine(response.StatusCode);
         var result = response.Results;
         foreach (var item in result)
        {
             // Text にサジェスト用の文字列(キーワードに該当したフィールドの値)が設定される
             // item.Documentでドキュメントのフィールドにもアクセスできる
             Console.WriteLine("サジェストされたテキスト:{0}", item.Text);
        }
     }
     catch (Exception ex)
     {
         Console.WriteLine("Error suggest: {0}\r\n", ex.Message.ToString());
     }
 }

さんのコメント: さんのコメント: