Sitecore 9では、Owinを使ったFederated Authentication(フェデレーション認証)がサポートされています。ライブサイトへのログインとSitecore の編集環境へのログインの両方で利用できます。
実際にログインする例をこちらのページで紹介しています。
今回は、実際にAzure ADを使用してSitecoreのインタフェースにログインできるようにする手順を記載します。
検証環境は次の通り
- Sitecore 9 Initial Release
- Windows Server 2016, SQL Server がインストールされたオールインワン環境
- Visual Studio 2015 Community Edition
1.手順の確認
まずは、Docサイトのページを一読します。
よくわからないかもしれません。頑張ってステップバイステップで実施していけばきっと理解できると思います。
2.設定の変更
Sitecoreのドキュメントサイトに記載している内容で、まずはSitecoreインストレーション環境のコンフィグを変更します。
2.1 Federated Authentication の有効化
App_Cinfog\Include\Example フォルダー内の、Sitecore.Owin.Authentication.Enabler.config.example の拡張子を .config にして、有効します。
2.2 Web.config の変更
SitecoreのWebルートフォルダー直下の Web.config を開き、 <ahthentication mode="Forms"> となっている箇所をNoneに変更します。
    <authentication mode="None">
      <forms name=".ASPXAUTH" cookieless="UseCookies" loginUrl="Sitecore/login" />
    </authentication>
Sitecore 9.0 update-1 以降の場合は、さらに<add key="owin:AutomaticAppStartup" value="true" />の設定を追加する必要があるとドキュメントサイトにありますので、環境に応じて設定を追加します。
3. プロセッサーの実装
対象のSitecoreの開発インスタンス用に、Visual Studioで使用するWebアプリケーションプロジェクトをセットアップしてください。今回は FedAuthSampleという名前のWebアプリケーションプロジェクトを作成した前提で説明を記載します。
3.1 NuGetパッケージの追加
プロジェクトにフェデレーション認証に必要なDLLの参照を追加します。
Microsoft.Owin.Security.OpenIdConnect は バージョン 3.1.0 をインストール。
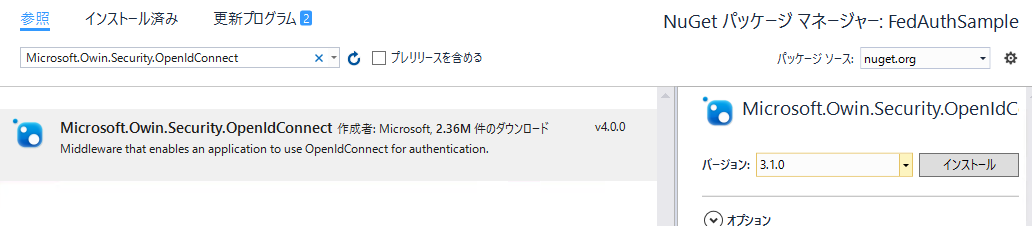
Microsoft.Owin.Security.Cookies は バージョン 4.0.0 をインストール。

上記パッケージをインストールすると、Microsoft.IdentityModel.Protocol.Extensionsもインストールされるのですが、Sitecore のWeb.configで参照されているバージョンより古いので、 1.0.4.4 で更新します。

今回は、SitecoreのWeb.configでいくつかDLLが参照されているので、それと同じもしくは、それより新しいバージョンを参照に追加しました。メジャーバージョンがあまりに違いすぎるDLLの解決が面倒になるので注意してください。
プロジェクトのWeb.configとSitecoreのWeb.configを別々で管理している場合は、assemblyBindingを見て参照しているDLLのバージョンがSitecoreのWeb.configの設定より新しくなってい場合は、適切に設定を反映してください。
最後に後で作成するプログラムで必要なAPIを格納した、 Sitecore.Owin.Authentication.dll への参照も追加します。これはSitecoreのインストールされたbinフォルダーのdllをコピーするか、Sitecoreのpublic NuGetを使用して参照を追加してください。
3.2 プログラムの作成
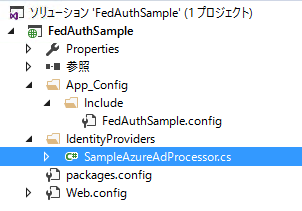
次に、プロセッサーを作成します。下図のように SampleAzureAdProcessor という名前でクラスを作成します。
サンプルの実装例は次の通りです。継承するクラスの説明などは冒頭で紹介したドキュメントサイトに記載されています。ここで何をやっているのかというと、スクラッチで作成するASP.NETのサイトを構築するときに、Startup.cs ファイルなどでOwinで認証するときに必要な初期セットアップを行いますが、Sitecoreの場合は、このカスタムプロセッサーの中で実施するというだけです。今回の例ではAzure AD用の設定をここでは行っています。
初期セットアップをプロセッサーで実施しているだけなので今回の例は、インターネット上で見られる一般的なサンプルとほぼ同じことを実施しています。大きく異なるのは SecurityTokenValidated ハンドラで、クレームを変換しているコードを追加している部分です。
namespace FedAuthSample.IdentityProviders
{
    public class SampleAzureAdProcessor : IdentityProvidersProcessor
    {
        public SampleAzureAdProcessor(FederatedAuthenticationConfiguration federatedAuthenticationConfiguration) : base(federatedAuthenticationConfiguration)
        {
        }

        protected override string IdentityProviderName
        {
            get
            {
                return "FedAuth";
            }
        }
        protected override void ProcessCore(IdentityProvidersArgs args)
        {
            var identityProvider = GetIdentityProvider();
            IAppBuilder app = args.App;
            string clientAppId = "XXXXXXXX-XXXX-XXXX-XXXX-XXXXXXXXXXXX";
            string authority = "https://login.microsoftonline.com/common/";
            string replyUrl = "https://xp0.sc/";

            app.UseCookieAuthentication(new CookieAuthenticationOptions()
            {
                CookieSecure = CookieSecureOption.Always
            });
            var options = new OpenIdConnectAuthenticationOptions
            {
                ClientId = clientAppId,
                Authority = authority,
                AuthenticationType = "FedAuth",
                TokenValidationParameters = new TokenValidationParameters{ ValidateIssuer = false },
                RedirectUri = replyUrl
            };
            var notifications = new OpenIdConnectAuthenticationNotifications
            {
                SecurityTokenValidated = notification =>
                {
                    var identity = notification.AuthenticationTicket.Identity;

                    foreach (var claimTransformationService in identityProvider.Transformations)
                    {
                        claimTransformationService.Transform(identity,
                            new TransformationContext(FederatedAuthenticationConfiguration, identityProvider));

                    }
                    notification.AuthenticationTicket = new AuthenticationTicket(identity, notification.AuthenticationTicket.Properties);


                    return Task.FromResult(0);
                }
            };
            options.Notifications = notifications;
            app.UseOpenIdConnectAuthentication(options);
        }
    }
}
clinetAppIdに設定しているアプリケーションIDはAzure ADに登録したアプリケーションIDを使用してください。replyUrlもAzure ADで登録したアプリケーションで設定したURLを指定します。
3.3 configファイルの編集
作成したプロセッサーを組み込みます。さらに、最低限必要な設定をパッチファイルに含めます。
今回は、FedAuthSample.configという名前でIncludeフォルダー配下にパッチファイルを作成しました。pipelines/owin.identityProviders ノードで、作成したプロセッサーを追加しています。federatedAuthentication/identityProviders/identityProvider ノードで、プロバイダーの登録を行っています。今回は、Sitecore標準で提供されるDefaultIDentityProvider を使用しています。
shellとloginサイトで、FedAuthという名前で登録したIdentityProviderを使えるようにしています。また、動作確認用に、認証が成功したらAdministrator になるように設定しています。各ノードの細かい説明はドキュメントサイトを見るようにしてください。
<?xml version="1.0" encoding="utf-8"?>
<configuration xmlns:patch="http://www.sitecore.net/xmlconfig/" xmlns:role="http://www.sitecore.net/xmlconfig/role/">
  <sitecore role:require="Standalone or ContentDelivery or ContentManagement">
    <pipelines>
      <owin.identityProviders>
        <processor type="FedAuthSample.IdentityProviders.SampleAzureAdProcessor, FedAuthSample" resolve="true" />
      </owin.identityProviders>
    </pipelines>
    <federatedAuthentication>
      <identityProviders>
        <identityProvider id="FedAuth" type="Sitecore.Owin.Authentication.Configuration.DefaultIdentityProvider, Sitecore.Owin.Authentication">
          <param desc="name">$(id)</param>
          <param desc="domainManager" type="Sitecore.Abstractions.BaseDomainManager" resolve="true" />
          <caption>Login with AzureAd</caption>
          <icon>/sitecore/shell/themes/standard/Images/24x24/msazure.png</icon>
          <domain>sitecore</domain>
          <transformations hint="list:AddTransformation">
            <transformation name="set idp claim" ref="federatedAuthentication/sharedTransformations/setIdpClaim" />
          </transformations>
        </identityProvider>
      </identityProviders>
      <identityProvidersPerSites>
        <mapEntry name="AzureAd" type="Sitecore.Owin.Authentication.Collections.IdentityProvidersPerSitesMapEntry, Sitecore.Owin.Authentication">
          <sites hint="list">
            <site>shell</site>
            <site>login</site>
          </sites>
          <identityProviders hint="list:AddIdentityProvider">
            <identityProvider ref="federatedAuthentication/identityProviders/identityProvider[@id='FedAuth']" />
          </identityProviders>
          <externalUserBuilder type="Sitecore.Owin.Authentication.Services.DefaultExternalUserBuilder, Sitecore.Owin.Authentication">
            <param desc="isPersistentUser">true</param>
          </externalUserBuilder>
        </mapEntry>
      </identityProvidersPerSites>
      <propertyInitializer type="Sitecore.Owin.Authentication.Services.PropertyInitializer, Sitecore.Owin.Authentication">
        <maps hint="list">
          <map name="set name" type="Sitecore.Owin.Authentication.Services.DefaultClaimToPropertyMapper, Sitecore.Owin.Authentication">
            <data hint="raw:AddData">
              <source name="http://schemas.xmlsoap.org/ws/2005/05/identity/claims/upn" />
              <target name="FullName" />
            </data>
          </map>
          <map name="set as admin" type="Sitecore.Owin.Authentication.Services.DefaultClaimToPropertyMapper, Sitecore.Owin.Authentication">
            <data hint="raw:AddData">
              <source name="http://schemas.xmlsoap.org/ws/2005/05/identity/claims/upn"></source>
              <target name="IsAdministrator" value="true" />
            </data>
          </map>
        </maps>
      </propertyInitializer>
    </federatedAuthentication>
  </sitecore>
</configuration>
プログラムを発行してビルドしてみます。
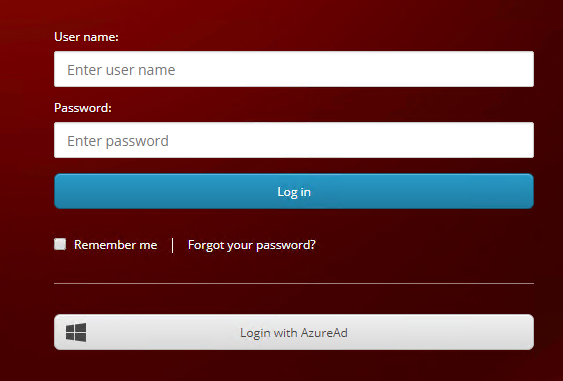
4.動作確認
これでログイン画面にアクセスすると次のようになります。Login with AzureAdをクリックすると、Azureの認証画面にリダイレクトします。
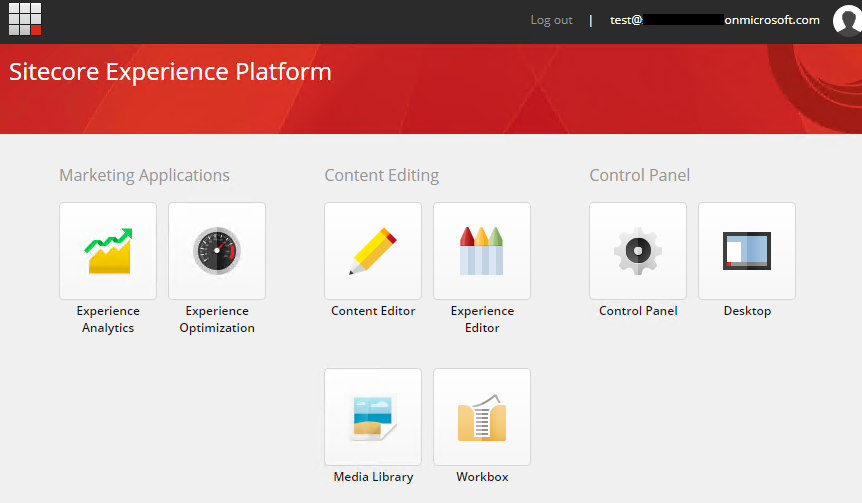
あらかじめ作ったユーザーでログインしてうまくいくとログインできます。
5.Azure AdのグループとSitecoreロールのマッピングを定義する
Azure AdのグループとSitecoreロールのマッピングを定義してAdminではなく、ロールを付与したSitecoreユーザーとしてログインできるようにします。
今回あらかじめ 下図のようにSitecore UserというAzure Ad上のグループを作成しておきました。グループ情報が連携されるのは、Azure ADに登録したアプリケーションのマニュフェストを変更して、 groupMmebershipClaims を "All" にします。

グループのIDをメモしておきます。FedAuthSample.configを開き、次のように、transformationsノードに、transformation ノードを1つ追加します。この中で、groupsクレームに Sitecore UserグループのIDがあった場合は、Developer ロールに変換するようにしています。
          <transformations hint="list:AddTransformation">
            <transformation name="set idp claim" ref="federatedAuthentication/sharedTransformations/setIdpClaim" />
            <transformation type="Sitecore.Owin.Authentication.Services.DefaultTransformation, Sitecore.Owin.Authentication">
              <sources hint="raw:AddSource">
                <claim name="groups" value="AAAAAAAA-BBBB-CCCC-DDDD-XXXXXXXXXXXX" />
              </sources>
              <targets hint="raw:AddTarget">
                <claim name="http://schemas.microsoft.com/ws/2008/06/identity/claims/role" value="sitecore\Developer" />
              </targets>
              <keepSource>true</keepSource>
            </transformation>
          </transformations>
さらに、IsAdministatorを強制的にtrueにしていた設定は削除します。
変更したファイルをSitecoreのフォルダーにデプロイします。
これで準備ができたので、再度SitecoreインタフェースにAzure Ad上のユーザーでログインしてみます。
うまくいくと、次のようにDeveloperロールの権限を持つユーザーとしてログインできるはずです。
検証用に作ったAzure AD上でのアプリケーションの登録方法やユーザー、グループの作成方法は別の機会にご紹介します。

さんのコメント: さんのコメント: